

Thermostat XH-W1209

₵45.00
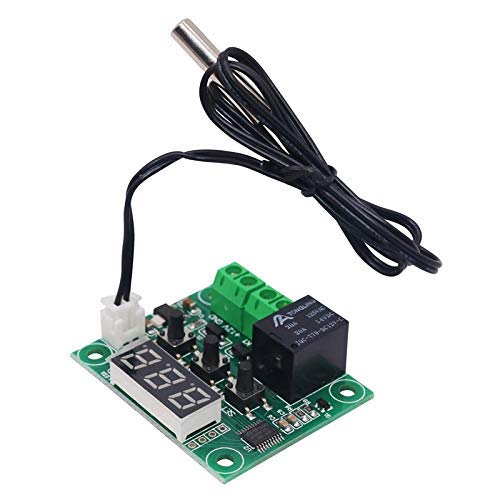
The XH-W1209 Digital Thermostat is a highly accurate and affordable temperature controller module. It is the industry standard for DIY egg incubators, aquarium temperature management, and other heating/cooling projects that require 12V DC power.
Long press the ‘SET’ button to enter the menu. Change setting P0 to ‘H’ for Heating (Incubators) or ‘C’ for Cooling (Fans).
5 in stock
Here is a complete breakdown of the module, how to wire it, and how to program it.
Key Features
- Precise Control: Senses and controls temperature with a 0.1°C accuracy.
- Wide Temperature Range: Can be set to control temperatures from -50°C to +110°C.
- Onboard Relay: A built-in 10A-20A relay acts as a switch to control your heater or cooling device.
- Digital Display: The 3-digit red LED display shows the current temperature and programming settings.
- Included Sensor: Comes with an NTC 10K (0.5%) waterproof temperature sensor.
Technical Specifications
| Feature | Specification |
| Model | XH-W1209 |
| Operating Voltage | DC 12V |
| Temperature Range | -50°C to +110°C |
| Resolution | 0.1°C (from -9.9°C to 99.9°C) |
| Control Accuracy | 0.1°C |
| Refresh Rate | 0.5 Seconds |
| Sensor Input | NTC (10K 0.5%) Waterproof Sensor |
| Output | 1-Channel Relay (10A/20A) |
| Dimensions | 48mm x 40mm |
How to Wire the XH-W1209
This is the most important part. There are two separate circuits to wire:
- Powering the Module (12V DC): This gives the thermostat’s brain and display power.
- Powering the Load (Your Device): This is the heater or fan you want to control. The relay (K0/K1) acts as a simple light switch for this circuit.
Connections:
- Sensor:
- Plug the 2-pin white connector from the NTC sensor into the white socket on the board.
- Module Power (12V DC):
- +12V: Connect the positive wire from your 12V DC power supply.
- GND: Connect the negative (ground) wire from your 12V DC power supply.
- Load (Heater/Fan) Terminals (K0 / K1):
- These terminals are just a switch; they are NOT a power source.
- Think of the relay as cutting one wire of your device’s power cord.
- K0: Connect this to the live wire of your device (e.g., your 220V AC live wire or 12V DC positive wire).
- K1: Connect this to the live wire from your device’s power source (e.g., the wall socket or the 12V supply).
- The neutral/ground wires of your device are connected as they normally would be, bypassing the thermostat completely.
How to Program the XH-W1209
There are two main settings: the Target Temperature and the Programming Menu (P0-P6).
1. Setting Your Target Temperature
This is the temperature you want to maintain.
- Press the
SETbutton once. The display will flash. - Use the
+and-buttons to choose your target temperature. - Press
SETagain (or wait 5 seconds) to save it.
2. The Programming Menu (P0 – P6)
To get the module to behave correctly (i.e., heat or cool), you must set these options.
To Enter the Menu: Press and hold SET for 5 seconds. The display will show P0.
Use + or – to move between P0, P1, P2, etc.
To edit a setting, press SET, use +/- to change the value, and press SET again to confirm.
| Code | Name | Description | Range | Default |
| P0 | Heating/Cooling | H = Heating Mode. The relay turns ON when temp is below your target.
C = Cooling Mode. The relay turns ON when temp is above your target. |
H / C | C |
| P1 | Hysteresis | The “return difference.” How many degrees past the target before the relay turns OFF. This stops the relay from rapidly switching on/off. | 0.1 – 15° | 2.0° |
| P2 | Upper Limit | The highest target temperature you can set. A safety feature. | 110°C | 110°C |
| P3 | Lower Limit | The lowest target temperature you can set. A safety feature. | -50°C | -50°C |
| P4 | Calibration | If your sensor is off, you can correct the reading here (e.g., set to -0.5 if it reads 0.5° high). | -7.0 – 7.0° | 0 |
| P5 | Delay Start | Delays the relay from turning on for a set number of minutes. Useful for compressors. | 0 – 10 min | 0 |
| P6 | High-Temp Alarm | If the temperature reaches this value, the relay will turn OFF and the display will flash ---. |
0 – 110°C | OFF |
Example: Setup for a Chicken Incubator
- Goal: Keep the temperature at 37.5°C using a heating bulb.
- Settings:
- Set Target Temp: Press
SET, use+/-to set the display to 37.5. PressSETagain. - Set Mode (P0): Hold
SETfor 5s.P0will show. PressSET. Use+to change it to H (Heating). PressSET. - Set Hysteresis (P1): Use
+to go toP1. PressSET. Use+/-to set it to 0.5. PressSET.
- Set Target Temp: Press
- Result: The heater will turn ON when the temperature drops to 37.0°C. It will turn OFF when the temperature reaches 37.5°C.
Be the first to review “Thermostat XH-W1209”
Related products


Reviews
There are no reviews yet.